Author: Julie Schoonmaker

Content Planning for Commencement 2021

Timeline of Duke's Commencement Announcement - March 2, 2021: Duke announces plans to hold an in-person commencement ceremony for seniors only. Marching 31, 2021: Duke invites remote seniors and students who graduated early to the in-person ceremony. April 8, 2021: Duke allows seniors to bring two guests each to the 2021 in-person ceremony. May 2, 2021: Duke holds an in-person commencement for all members of the Class of 2021 and allows each senior to bring two guests each to the ceremony.

Infographic timeline showing the dates of Duke’s Commencement Announcements.

In a typical year, our team starts planning for commencement in January, but 2021 is not a typical year.

We knew that we needed to plan content for commencement, but due to COVID-19, no one knew if the ceremony could be an in-person event, a virtual ceremony, or a hybrid of both. In many ways, we were chasing a moving target.

We decided to create short videos because this format can be incorporated into websites, e-newsletters, shared on social media platforms and even shared during in-person ceremonies. This decision proved to be wise because the scope of the ceremony changed twice from the time Duke’s initial announcement that it was holding an in-person ceremony to May 2, the date of the ceremony.

After a brainstorming session, we decided to focus on producing four videos.

Class of 2021 Memories, Moments & Milestones

The Class of 2021 Memories, Moments & Milestones piece recapped the events of the past year years. Our reason for producing this piece was to provide a virtual walk down memory lane for the graduates and their families that could work as a part of a virtual or in-person event. 

Family Messages for Duke Class of 2021

Initially, family and friends could not attend the in-person ceremony, so we produced Family Messages for Duke’s Class of 2021, a video montage of tributes from parents and siblings of the Class of 2021. Thankfully, as we got closer to May 2 and the number of infections decreased, Duke allowed a limited number of guests to attend the ceremony. This piece would have been a must for a virtual ceremony. However, it also worked well for the in-person event because it allowed multiple family members and friends to celebrate their graduates.

Class of 2021 Reflections

The Class of 2021 Reflections video featured interviews with members of the class speaking about their time at Duke and thanking those who supported them. For this video, the students spoke directly into the camera, and we combined their voices with slow-motion clips of them looking into the camera. This approach mimicked an in-person conversation and allowed the viewers to feel connected with the students highlighted in the piece.

While this piece ended up not being used in the ceremony, we re-edited it into two shorter promotional videos and both of these videos were widely shared. 

Duke University Class of 2021 Commencement Celebration

The idea for the Duke University Class of 2021 Commencement Celebration video was to create a video that could serve as a stand-in for in-person congratulatory high-fives and hat tosses, should Duke have to have all virtual ceremony. Thankfully, that wasn’t the case, but the video is just fun to watch and was a fantastic way to close our in-person ceremony. Check out Jared Lazarus’s blog post and learn more about the work that went into making the video.

Commencement Communicators Kit

To help Duke’s communicators’ network plan for in-person and virtual commencement ceremonies and tributes to the Class of 2021, we created a commencement communicators kit with downloadable assets including stock imagery, virtual backgrounds, graphics, video elements, GIFS, and more.

Duke graduates spin around holding balloons spelling out their class year, 2021.

GIF of graduates celebrating with 2021 balloons.


In an effort to give all of Duke’s commencement content a similar look and feel, the elements in the kit contained uniformed Duke branding including colors, fonts, and style. We made this material available over a month in advance of commencement and it proved to be an extremely valuable resource with more than 3,736 downloads.
Graphic explaining the total downloads in the Duke Commencement Communicators Toolkit. As of May 4, 2021, total downloads: 3,736. Most popular individual downloads: Zoom backgrounds: 1,024, Professional School photos/broll: 1,043, Logos: 621, GIFS: 330, Commencement Signs: 197

Figures highlighting the communicators kit downloads.

We will remember this commencement as a moving target in terms of planning (thanks, COVID). However, we’re proud to have produced
a wide collection of content that proved beneficial for use in a variety of settings and publications.
Check out our full coverage of Duke’s 2021 commencement at commencement.duke.edu

And congratulations to the Class of 2021!

Smart Phone Filming Cheat Sheet

Since everyone has been working from home for the past couple months, I’ve received at least 100 video files, maybe more, from students, faculty, staff and alumni. With a little bit of video editing work, I’ve turned the self-recorded videos into video messages or montages with video reflections strung together to tell a story or share collective thoughts.

I’ve been impressed with the quality of some videos I’ve received, especially the ones filmed on smartphones. The majority of our cell phones now capture video in 4K resolution, so it makes sense the image would come across crisp and clear, making it simple to edit the footage and share it on websites, video sharing platforms and social channels.

Our creative team has run into problems with quite a few of the videos that have been recorded using web conferencing technology. In many cases, the settings have not been updated to capture footage in high definition, so we receive video files that have very low resolution. Those small files make editing brutal because no matter how great the message is, the footage is blurry especially when appearing next to another clip captured in HD.

To ensure the best resolution possible on your at home video recordings, our creative team created a cheat sheet to make sure your video messages shine when viewed online. We recommend to keep it simple and use your smart phone to record, make sure it’s turned in the horizontal position and prop it against a makeshift tripod to keep your phone stable and eye-level. It’s also key to find a quiet place to record videos with a nice backdrop that’s well-lit. The hope is, once you have a good recording system in place, it will be simple to record video messages on a regular basis without thinking much about your set up.

Smart Phone Filming Cheat Sheet. Find a quiet, well-lit filming location. Final a pleasant, neutral backrop like a home office or book shelf. For filming inside, face a window (with indirect sunlight) or light source so light appears pleasant with gentle shadows. Avoid sitting with your back against the window because it will create a dark silhouette. Stabilize your phone for filming. Lean your phone against something stable and sturdy like a computer monitor or stack of books. Position your camera at eye-level. Position your phone. Filming in the horizontal/landscape position will ensure the recorded video fills the screen; this is preferable for a video that will be posted on a web page or YouTube. Record the video. Check camera settings to ensure your phone is set to film in 1080p HD or 4K at 24 or 30 frames per second. Bring up your phone's video camera and press record. Speak at a natural volume and look towards your device's camera. Distribute the video. After the recording is complete, send the video file to the appropriate parties via email, text or Duke Box app. Common question: what should I wear on camera? Bright, jewel tones look best. Avoid prints and patterns which can be distracting.

Instructions for filming video messages or interviews from home using your smart phone.

Download the Cheat Sheet as a PDF

Using Zoom to Record Videos on Your Computer

The images depicts a young woman sitting in front of a laptop for video conferencing.

These steps will guide you through the process of creating video recordings using zoom.

Step 1. Install Zoom meetings software

Zoom is available to Duke students, faculty, and staff free of charge.

You can download it here:

https://duke.zoom.us/download

Step 2. Under Zoom preferences, adjust the following settings

Audio Settings
  • Under audio settings, select “automatically adjust microphone volume

The image shows the location of the option to have zoom automatically adjust volume.

Be sure to select the option to “automatically adjust microphone volume” to ensure the best results.

Video Settings
  • Under video settings, select “16:9 (widescreen)”
  • Under video settings, select “enable HD”

The image shows the location of the video settings in zoom.

Select the 16:9 (Widescreen) option and the “Enable HD option for best results.

Recording Settings
  • Under “local recordings” at the very top, pick a spot on your computer to store your video recordings. (for instance, you can create a folder on your desktop called “Zoom recordings” and send all your clips there.)
  • Under recordings, select “optimize for 3rd party editor” which will make the video clips ready for editing.

This image show the location of the option to "optimize for 3rd party video editing" on zoom.

Under “local recordings” at the very top, pick a spot on your computer to store your video recordings. Then select “optimize for 3rd party editor” which will make the video clips ready for editing.

Step 3. Launch Zoom and select “new meeting,” which is the orange icon on the top row
  • If prompted, allow Zoom to access your computer’s video camera and microphone
  • When the next screen pops up, you should be able to see a video of yourself

This image shows the location of the " "Join With Computer Audio" tab on zoom.

When prompted, select the “Join With Computer Audio” tab.

Step 4. Select “unmute”

Be sure that you are “unmute” (on the lower-left corner of the recording screen) so the computer will record your voice

This image shows the location of the mute button on zoom. It is located in the lower left corner of the screen.

The mute button is located on the lower-left corner of the screen. Make sure you are not muted when you begin your recording.

Step 5. Begin recording
  • In the menu bar on the bottom of the screen, select “record” and choose whether you’d like to save your recording to the computer or cloud
  • Direct your gaze toward the top of the computer screen where the camera is located
  • Speak clearly at your normal volume.

The image shows the location of the record button on zoom. It is located on the bottom of the screen, toward the middle.

The record button is located on the bottom of the screen, toward the middle on the screen.

Step 6. Conclude recording
  • Press “stop recording” on the top left of the screen
  • Then select “end meeting” on the bottom right of the screen
  • At that point, your video will convert to a .mp4 video file
  • You can share the file through Duke Box

*If you use a smartphone or tablet for video recordings, make sure to record video in one of the following settings:

  • 1080 HD at 24 or 30 frames per second (this option will take up less recording space on your device)
  • 4K at 24 or 30 fps

Producing Something Special Under a Very Tight Deadline

Last fall, I was given one of my toughest challenges yet—to produce a video highlighting the Duke President’s strategic plan in about ONE MONTH. The video needed to be done quickly to showcase at pre-scheduled alumni events around the country. I wanted the video to do justice to President Vincent Price’s vision. Usually it takes a couple months of work (storyboarding, scouting locations, filming, editing, reviewing) to bring a video of this magnitude to life. Luckily, I work with an incredibly talented creative team. I knew that I would need their help to make this happen and they were more than happy to work together on this major project.

I prioritized the two things I felt were most important. First, finding the best way to showcase President Price immersed in campus. Since fall is such a beautiful time of year at Duke, it felt crucial to place President Price in Duke’s natural backdrop. Second, it was also important to showcase President Price interacting with students to symbolize him sharing his vision for the future of Duke with them. Meeting with students is something President Price naturally does all the time and I wanted the opportunity to bring those special moments to life.

I asked my colleague Megan Mendenhall to scout possible locations for the scenes with President Price on West Campus. From spots by Duke’s clocktower to the Chapel, Megan narrowed down beautiful 11 spots. After reading the final script for the video, I settled on filming in Few Quad because Duke’s first President William Preston Few is referenced numerous times throughout the video. The quad is also tucked away a bit from a lot traffic and noise that occurs on West Campus.

Along with the colorful trees in Few Quad, I liked the natural foot traffic that occurred as students walked from their residential hall to other parts of campus. My vision was for students to continue walking by as President Price spoke on camera. However, I was concerned students would be startled by our large lighting and camera set up and, of course, Duke’s President right in the middle of the quad. 
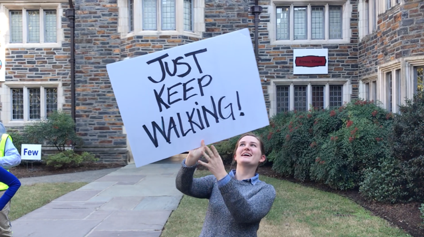
In hopes of keep students moving along, I created a large sign that read “Just Keep Walking” and asked my colleague Caroline Pate to hold it up during the shoot. It worked perfectly. Students kept walking right through the shot in a natural way allowing us to showcase campus life at its best.

For the video’s special on campus moment, I also wanted to try out something a little different by creating a dolly-like movement as President Price spoke on camera. After a couple trial runs, the karma grip stabilizer with the go pro did not produce a smooth enough shot. My colleague Bill Snead and Sam Huntley tested out walking backwards while hand-holding a drone and using the drone gimbal as a steady cam. It worked nicely because there was no noise coming from the drone and it was very smooth. On the day of the shoot, we first captured a traditional shot of the President on camera to make sure we had something usable. Then we captured the drone walking shot. In the end, we used the walking shot because it created the more personalized, dynamic feel.

Since we had a 30-minute window with President Price, we wanted to use the time frame to also capture him with students in Few Quad. Bill Snead, our talented drone pilot, quickly filmed some lovely shots of President Price in natural conversation with three students.

President Vincent Price talks with students in the Few Quad during a nice Fall afternoon.

After the outdoor shoot, I got to work editing. But the capture did not end there. Bill captured beautiful campus drone imagery that included movement and campus activity. Megan and Jared Lazarus filmed engaging classroom moments and library studying scenes. Once we got all the footage back in house, my creative director Blyth Morrell and I combed through all the material to pinpoint which shots mapped closely to the five planks in President Price’s vision.

In the end, our creative team produced a video I am very proud of and, more importantly, President Price feels good about it. Looking back, I learned some important lessons in the process. A big takeaway includes not getting intimidated by a tight deadline. Having a vision along with an action plan can go a long way. I discovered it’s also crucial to realize that you don’t have to do everything by yourself. In some cases, it’s impossible. I’m fortunate to have a talented team to collaborate with. I’m still in awe of the way everyone came together so quickly and efficiently. Even a task that may have seemed like a small role, such as holding a sign, made a huge difference in the end. As daunting as the timeline may have been at the beginning of the project, I think it pushed us all to be our very best and resulted in something really special.

Mary Magdalene discovery

One of the biggest challenges I face as a higher ed video creator is how to bring historical research to life. Because this sort of research involves things that have happened in the past, it can be challenging to find a captivating visual way to explain the findings. Recently, I was recently asked to showcase the research of Elizabeth Schrader, a graduate student from Duke Divinity School. She discovered Mary Magdalene’s name had been altered by scribes in numerous copies of the Bible to downplay her prominence. I asked Elizabeth to meet me at Duke’s Rubenstein Library archives where she’d found an example of the change to Mary’s name in a 12th-century manuscript. I planned to capture a few slider shots of her looking at the manuscript. I thought the visual would make a nice compliment to my colleague’s article on her research.

When I met with Elizabeth, we struck up a casual conversation and she described in detail the exact thing she’d discovered. On two adjacent bible pages, she showed me Mary’s name, Martha’s name and a third name where Mary’s name was altered to Martha’s name. Seeing all three ancient Greek words while simultaneously hearing Elizabeth’s explanation brought her discovery to life before my eyes. I wanted to help the public understand her work. A simple slider shot would not do her research justice.

I scrapped my initial visual plan. Instead, I asked my colleague to photograph the two bible pages where the three examples occurred.

I recorded audio of Elizabeth explaining her findings. Then I found each name in the digital version of the same manuscript pages and cropped them out.

Using Premiere Pro, I matched the three names to the actual spot in the Bible photograph where they appear. I laid the voice track of Elizabeth’s explanation below the visual.      

I used Premiere Pro’s spotlight effect to highlight each name as Elizabeth described them in detail.

The final visual showcased Elizabeth’s research in a way that made her discovery easy to comprehend.

The experience reminded me to take the time to talk to researchers I work with and really understand their work, which will result in finding the best possible way to showcase it.

I was also flexible and open to shifting gears on the fly, which can be tough to do but was the right move in telling this story effectively.

Shortly after Duke’s Communications Office shared her story, Elizabeth sent me an email:

 “Julie your videos are AMAZING!!! I am so impressed with the work you’ve done! Those videos are simply spectacular. They are so easy to understand, and pretty too. It makes the article stand out so much! … This is incredible work – thank you thank you for this amazing contribution to helping make people aware of my research! I hope our paths cross again soon so I can thank you in person :)”

Powered by WordPress & Theme by Anders Norén